

In the first part of this series I have already shown you how to use an atmospheric particle effect on your photos. In this second tutorial about photo animation in Adobe After Effects I will give some tips on how to use the “Turbulent Displace” effect to animate water and bring your image to life.
As always, the described path is one of many possibilities. I decided on the “Turbulent Displace” as an effect which can achieve fast and effective results with the imitation of waves. Should you look for more complex solutions, After Effects also offers, for example, the “Wave World” Effect.
The Effect “Turbulent Displace”
With the effect “Turbulent Displace”, you can create patterns or distortions that serve as the basis for movement in an image by moving pixels according to this distortion. This effect combines two other effects into one: “Fractal Noise” and “Displacement Map”.
In order to make it all a bit more tangible, we have created a graphic with a simple grid on which we have applied the effect with different settings. You can download the graphic here for test purposes:
Our animations have one rotation of “Evolution”, over 6 seconds, as well as the activated “Cycle Evolution” (more on this under “Adjustment of the Effect”):
Next to “Turbulent”, “Bulge” and “Twist” Adobe AE offers amongst others the options “Turbulent (smoother)”, “Bulge (smoother)” and “Twist (smoother)”. These will each produce the same trick, only with the difference that the option “smooth” produces smoother warps, that may take Adobe more time to render, as Adobe explains here.
Creation of the Composition and Layers
- We begin with the creation of our realistic water animation. Exactly like in the first part of the editing tutorials, we begin with creating a composition in Full HD (1920×1080 Pixels) with a frame rate of 29,97 fps and set the length of the composition. I have decided here to create a 4 second video.
- Subsequently we import our photo containing the water that we would like to animate. This can be done by clicking twice in the window “Project”, and selecting our file.
- We next drag this layer into our composition window next to the timeline.
- Now we can already use the effect. In comparison to the Atmospheric Particle Animation we do not need to create any new layers, because the effect is applied directly onto the image. To do this we open the “Effects & Presets”, which can be activated by the menu item “Window”. We search here for the effect “Turbulent Displace” and apply it by dragging it onto our layer to be animated.
This is how you create the composition with the correct settings, import the pictures imported and apply the effect:
Adjustment of the Effect
Now it’s time to adjust the effect using the operating panel “Effect Controls”, which has opened automatically. In the following I will give some recommendations for the settings. However, you can also have free room to play around, as the customisation is dependent on the image.
I have only dealt with the changes, that differ from the standard settings:
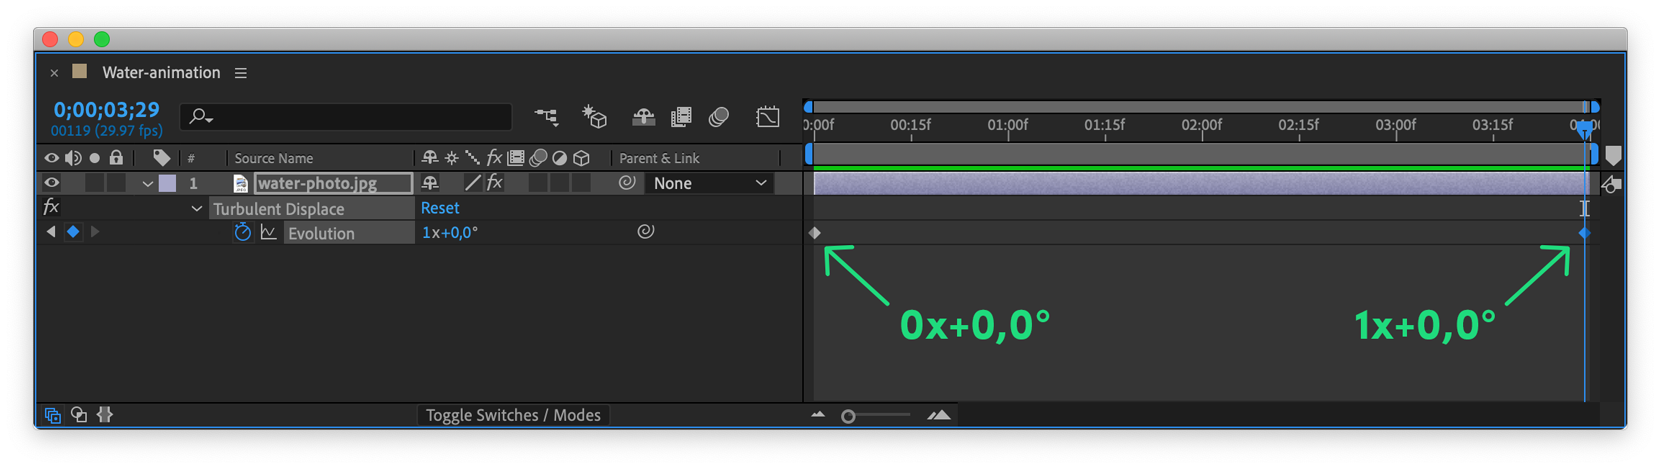

Evolution:
First keyframe right at the beginning of the timeline: 0x+0,0°
Second keyframe right at the end of the timeline: 1x+0,0° (equivalent to 0x+360°, thus a complete rotation)
Attention! Only if you have placed the keyframes for the evolution correctly in your timeline, you will see a movement, when you play the effect with the spacebar. To begin with the animation must be rendered once, before it can be played in real time. The animation is then rendered, when the green bar under the time marker runs continuously across the timeline (see the screenshot below).
Evolution Options: Cycle Evolution
This setting ensures that the pattern returns to its origin at the end of each rotation. This saves us from having to convert the video into a loop via crossfade. The programmatic return to the origin also achieves a perfect result. It functions, however, only by complete rotations.
Size: 20,0 (dependent on the size of the waves in the image)
In case you would like to speed up your waves, you can either give more rotations by “Evolution”, or also let the composition run for shorter (like described in step 1).
I explain how you can render your video in the first part of this series (on the subject of atmospheric dust animations). Our result is finally finished:


